EV Installation Information
eV INSTALLATION iNFORMATION
everything you need to know to get an eV charger installed at home

Is your home ready for an eV Charger?
Do the pre-installation check to see if your Home is ready. Read below for everything you need.
Why Power Supply Capacity Matters
Electric vehicle chargers are high-demand appliances. Unlike most household devices that use power intermittently, an EV charger can draw maximum load for several hours continuously. This makes it essential to evaluate your home’s electrical supply before installation.
If your supply is undersized, you risk:
- Frequent tripped fuses or breakers.
- Potential overheating of wiring.
- Expensive inefficiency (having to throttle charging power).
- In some cases, grid operator intervention due to overloading.
Types of Residential Supply in the Netherlands / EU
Most homes fall under two categories:
- Single-phase (1x230V)
- Standard in older or smaller homes.
- Typically connected with a main fuse of 25A, 35A, or 40A.
- Maximum practical EV charger size: 7.4 kW (32A).
- Adds ~30–40 km of driving range per hour of charging.

- Three-phase (3x400V + Neutral)
- Common in modern or upgraded homes.
- Usually rated at 3x25A, 3x35A, or 3x40A.
- Supports faster chargers:
- 11 kW (3x16A) → ~50–60 km per hour.
- 22 kW (3x32A) → ~100–120 km per hour.
- Many European EVs are optimized for 11 kW three-phase charging.

How to Check Your Supply
- Look at your main distribution board (fuse box):
- Single-phase → one large fuse/switch.
- Three-phase → three identical fuses/switches.
- Check your energy contract or smart meter details.
- Ask your grid operator (Liander, Stedin, Enexis, etc. in NL) if you’re unsure.
Some providers even allow you to upgrade remotely (smart meter-enabled), while others require an on-site intervention.
Check your fuse box.
Please contact us for more information at info@jmleplus.nl.
Upgrading from Single-Phase to Three-Phase
- Why upgrade?
- To support faster charging (11 kW or 22 kW).
- To balance household loads more evenly across phases.
- To prepare for future needs (e.g., two EVs, induction stoves, heat pumps).
- Costs:
- Typically €250–€1,000 in the Netherlands.
- Involves both grid-side changes and internal wiring upgrades.
- Process:
- Submit a request to your grid operator.
- JML eplus can prepare your distribution board for 3-phase.
- Operator visits to install/activate 3-phase connection.
Matching Charger to Supply
⚠️ Note: Actual charging speed also depends on the onboard charger in the car. For example, some EVs max out at 7.4 kW even if connected to an 11 kW charger.
Practical Considerations
- Household appliances vs charger: An EV charger can easily consume as much power as the rest of the home combined. Load balancing is often necessary.
- Future-proofing: Even if you don’t need three-phase today, running 5-core cabling prepares you for future upgrades without extra civil works.
- Multiple EVs: If you plan on having two EVs, three-phase is almost always required.
Key Takeaways
- Always verify your current supply (1-phase or 3-phase) before planning an installation.
- 7.4 kW (single-phase) is enough for many drivers charging overnight.
- 11 kW (three-phase) is the sweet spot for most Dutch/European EVs.
- 22 kW (three-phase) is ideal for future-proofing or very high daily mileage.
- A supply upgrade is often the smartest long-term investment when moving to electric mobility.
Why Assessing Capacity Matters
Installing an EV charger isn’t just about the device—it’s about whether your existing electrical system can handle the additional load safely and reliably. This section explains how to assess your home’s electrical capacity.
EV chargers draw continuous high current, unlike most household appliances, which are intermittent. Assessing capacity ensures:
- Cost efficiency: Prevents unnecessary grid upgrades or rewiring.
- Safety: Avoids overloading wires or tripping breakers.
- Performance: Guarantees optimal charging speeds.
- Future-proofing: Allows for potential upgrades, multiple EVs, or other high-power devices like heat pumps.
Understanding Your Main Fuse Rating
The main fuse (or main circuit breaker) in your home is the central point that protects your wiring from overcurrent. Understanding it is essential when planning an EV charger installation because it defines the maximum safe electrical load your home can handle.
Role of the Main Fuse
- Primary protection: Prevents overheating and fire by disconnecting electricity when current exceeds the safe limit.
- Load limitation: Determines the total power available to your household at any given moment, including EV charging.
- Safety compliance: Ensures adherence to electrical safety standards (e.g., NEN 1010 in the Netherlands, IEC 60364 internationally).
Think of the main fuse as a traffic gate—it controls the flow of electricity into your home. Exceeding the fuse’s capacity will trip it, just like too many cars causing a roadblock.
Common Fuse Ratings and Their Implications
Important: Never load a fuse to 100% continuously. Electrical standards recommend max 80% continuous load to prevent nuisance trips and heat buildup.
How to Check Your Main Fuse
- Locate the fuse box (meter cupboard)
- Usually near the front of the house or utility area.
- Identify the main fuse / breaker
- Single large switch for single-phase homes.
- Three identical switches for three-phase homes.
- Check the amperage rating
- Written on the fuse or breaker (e.g., 25A, 35A, 40A).
- Consult your electricity provider if unsure
- They can confirm your supply and maximum allowed load.

Single-Phase vs Three-Phase Fuse Considerations
- Single-phase fuse: Limits the entire home to one continuous current path. Maximum safe EV charging typically 7.4 kW (32A).
- Three-phase fuses: Distribute load across three wires, allowing higher total power. Common ratings: 3x16A (11 kW), 3x32A (22 kW).
- Phase balancing: Properly distributing household load across phases avoids overload on any single phase and maximizes charging efficiency.
Factors Affecting Main Fuse Capacity
- Household appliances: Oven, induction cooktop, heat pump, dryer.
- EV charger power rating: Continuous high current draw.
- Simultaneous usage: The total load from EV + appliances must remain below 80% of the fuse rating.
- Future-proofing: Adding a second EV or more high-power devices requires careful fuse assessment.
Upgrading or Adjusting Your Main Fuse
If your main fuse is insufficient for your desired EV charger:
- Increase fuse rating: Usually requires approval from your grid operator.
- Upgrade to three-phase: For higher charging speeds or multiple EVs.
- Install a sub-panel / extension cabinet: Allows adding circuits without changing the main fuse.
Costs vary but typically range from €250–€1,000 for a grid upgrade, excluding internal wiring modifications.
Practical Examples
Key Takeaways
- The main fuse defines the maximum safe load in your home.
- Always plan EV charging with 80% of fuse rating in mind.
- Single-phase limits charger speed; three-phase allows faster charging and better load distribution.
- Upgrading the fuse or adding a sub-panel may be necessary for high-power chargers or multiple EVs.
Summary:
Understanding your main fuse rating is the first step in planning a safe, reliable, and future-proof EV charger installation. Combine this with a household load assessment to choose the right charger size, schedule, and any necessary upgrades.
Accounting for Household Load
When planning an EV charger installation, one of the most critical steps is understanding how your existing household electricity usage interacts with the charger. Even if your home has a sufficient main fuse rating, simultaneous usage of multiple high-power appliances can cause overloads, nuisance tripping, or slow charging.
Why Household Load Matters
EV chargers are continuous high-power devices:
- A 7.4 kW charger draws ~32A (single-phase).
- An 11 kW charger draws ~16A per phase (three-phase).
- A 22 kW charger draws ~32A per phase (three-phase).
By comparison, common household appliances typically draw:
Example: Charging a 7.4 kW EV while the oven (4 kW) and dryer (2 kW) are running totals 13.4 kW, potentially exceeding a 25–35A main fuse.
Peak vs Average Load
- Peak load: The maximum simultaneous electricity demand at any given time.
- Average load: Typical household electricity usage over a longer period (e.g., overnight).
EV chargers usually run overnight, so average household load during night hours may be lower, which is favourable for single-phase 7.4 kW charging.
However, if high-demand appliances are used simultaneously (e.g., heat pump in winter), the combined load may exceed the fuse capacity.
Load Distribution Across Phases
For homes with three-phase supply:
- Appliances and EV chargers can be balanced across the three phases to reduce the risk of overload on a single phase.
- Example:
- Phase 1: Oven (3 kW) + EV charger (11 kW, 3-phase spread across phases).
- Phase 2: Dryer (2 kW).
- Phase 3: Heat pump (2 kW).
Tip: Proper phase balancing prevents nuisance trips and ensures maximum charger efficiency.
Household Load Assessment Steps
- Inventory your appliances: List all high-power devices and their rated power (kW).
- Estimate simultaneous usage: Identify times when multiple devices may run together.
- Compare to main fuse rating: Ensure the total load doesn’t exceed 80% of your main fuse capacity.
- Consider EV charging schedule: Overnight charging reduces conflict with peak appliance usage.
- Plan for future appliances or second EV: Anticipate added load.
Solutions to Household Load Issues
If your household load is high relative to your main fuse:
- Load balancing / smart charging: EV charger dynamically reduces charging power when other appliances are active.
- Stagger appliance usage: Schedule dishwashers, dryers, and ovens outside charging times.
- Upgrade supply or fuse: Increase main fuse or install a three-phase connection.
- Sub-panels / distribution upgrades: Split high-demand circuits to separate sub-panels.
Practical Example
Key Takeaways
- Assessing household load ensures safety, efficiency, and reliability of EV charging.
- Focus on simultaneous usage of high-power appliances.
- Three-phase connections offer more flexibility for balancing loads.
- Smart chargers and load management systems can mitigate most conflicts without costly upgrades.
Dedicated Circuit and Wiring & Cabling for Home EV Charger Installation
Installing an EV charger safely requires proper electrical protection and robust wiring. This section explains the requirements for dedicated circuits and cabling to ensure your EV charging system is safe, efficient, and compliant with regulations.
Dedicated Circuit
A dedicated circuit is an electrical circuit that serves only the EV charger and nothing else. It has its own breaker in the fuse box and is not shared with other household appliances.
Why it’s important:
- EV chargers draw high, continuous currents. Sharing a circuit increases the risk of overloads, overheating, and tripping breakers.
- Ensures maximum charging efficiency, because the charger can always draw its rated current.
- Compliance with NEN 1010 standards in the Netherlands (or IEC 60364 internationally).
Circuit Breaker Requirements
The breaker must be sized according to the EV charger and phase configuration:
Tip: Never exceed the breaker’s rated amperage. Always size the breaker to handle at least continuous load without nuisance trips.
Placement
- The dedicated breaker should be clearly labeled in the fuse box.
- Ideally, the circuit should be physically close to the charger location to minimize cable runs and voltage drops.
- If the main distribution board is far, a sub-panel or extension cabinet may be necessary.
Cable Type and Size
Choosing the correct cabling is critical for safety and efficiency. Improper cable sizing can cause:
- Overheating
- Voltage drops
- Fire hazards
Recommended cable sizes (copper, typical residential distances):
Tip: For longer cable runs (>20–25 meters), increase cable size to prevent voltage drop.
Cable Protection
- Conduits: Use protective conduits for indoor or outdoor installations.
- Armored cables: Recommended for underground or exposed routes.
- IP-rated enclosures: Outdoor cabling and charger boxes should be weatherproof (IP54 or higher).
Earthing and Safety
- All wiring must be properly grounded/earthened according to NEN 1010.
- Grounding ensures that any fault current is safely discharged, protecting users and equipment.
Cable Routing Tips
- Keep cable runs as short and direct as possible.
- Avoid routing near heat sources or sharp edges.
- Label both ends of the cable for easy identification.
- Consider future-proofing: run larger conduits or extra cores to allow upgrades (e.g., second EV).
Integration with Dedicated Circuit
- Connect the EV charger directly to the dedicated breaker using the correctly sized cable.
- Install an RCD (Type A + 6 mA DC detector or Type B) on the circuit for leakage protection.
- Ensure all connections are tight, secure, and comply with local regulations.
Key Takeaways
- A dedicated circuit is mandatory for safety and compliance.
- Correct cabling ensures efficient charging and prevents fire hazards.
- Plan wiring and breaker sizing with future upgrades in mind, especially if you anticipate higher kW chargers or multiple EVs.
Residual Current Devices, Load Management, and Earthing for Home EV Charging
Modern EV chargers introduce high continuous electrical loads and potential DC leakage currents, which are not fully addressed by standard household protections. Safe, reliable, and efficient EV charging requires careful integration of RCDs, load management systems, and earthing/grounding.
Residual Current Device (RCD) / Earth Leakage Protection
Why RCDs Are Critical
An RCD monitors current balance between live and neutral conductors. If some current leaks to earth—through a fault in the charger, EV, or wiring—the RCD disconnects the circuit almost instantly.
EV-specific concerns:
- EVs can leak pulsating DC due to onboard electronics.
- Standard Type AC RCDs detect only AC faults and may fail to trip for DC leakage, risking electric shock or fire.
RCD Types for EV Charging
Key Point: Always verify if your charger includes internal DC leakage detection. If yes, a Type A RCD may suffice; otherwise, Type B may be required.
Placement
- Main distribution board: Standard for homes with centralized RCDs.
- Integrated within the charger: Modern chargers often include their own RCD protection, simplifying installation.
- Must be accessible for testing, and clearly labeled.
Standards
- Comply with NEN 1010 (Netherlands) or IEC 60364 (Europe).
- Ensure sensitivity: 30 mA AC trip for human protection; 6 mA DC detection for EV-specific DC leakage.
Testing & Maintenance
- Press the “test” button every 3–6 months.
- Frequent nuisance trips may indicate:
- Faulty appliance or EV charger
- Wiring issues or improper earthing
Load Management (Dynamic and Static)
EV chargers are high continuous load devices, potentially exceeding your home’s electrical capacity when combined with other appliances. Load management ensures:
- Safe operation within main fuse limits
- Optimal charger performance
- Avoidance of unnecessary grid upgrades
Static Load Balancing
- Sets a fixed maximum current for the EV charger.
- Does not adjust dynamically to household usage.
- Simple to implement, but may underutilize available capacity if other loads are low.
Dynamic Load Balancing with CT Clamps
CT Clamps (Current Transformers):
- Installed around incoming phase conductors in the main fuse box.
- Measure real-time household electricity consumption.
- Communicate with the EV charger to adjust charging current dynamically, ensuring the total load does not exceed the main fuse capacity.
How it works:
- Household load rises (oven, dryer, heat pump).
- CT clamps detect increased current.
- Charger automatically reduces charging power to avoid exceeding the main fuse rating.
- When household load drops, charger increases current again.
Benefits:
- Prevents breaker trips without restricting normal appliance use.
- Maximizes charging speed within safe limits.
- Supports multiple EVs if the charger can manage several circuits.
Practical Notes:
- CT clamps can monitor single-phase or three-phase installations.
- Must be installed by a certified electrician around the main incoming cables.
- Works best with smart chargers.
Why Load Management Matters
- Many Dutch homes: 1x35A single-phase or 3x25A three-phase—limited capacity.
- Without load management, simultaneous high-power appliances + EV charging can:
- Overload the main fuse
- Trip RCDs
- Reduce charger efficiency
- Cause safety risks
Earthing & Grounding
Earthing ensures that any fault current is safely discharged to ground, preventing:
- Electric shock
- Damage to the charger or EV electronics
- Fire hazards from insulation faults
Requirements
- Must comply with NEN 1010 (Netherlands) or IEC 60364 (Europe).
- Earth resistance target: <30 Ω for residential installations.
- Poor soil conductivity may require additional ground rods or improved earthing systems.
Installation Tips
- Verify all metal parts of the charger are bonded to earth.
- Use corrosion-resistant, mechanically robust connectors.
- If upgrading a home, consider earthing the sub-panel as well.
- Always measure earth resistance post-installation.
Integration With RCDs and Load Management
- Correct earthing complements RCD protection, ensuring fault currents are safely redirected.
- Load management reduces the risk of overcurrent faults, minimizing the chances of RCD trips.
Key Takeaways
- RCDs protect against AC and DC leakage, preventing shocks and fire.
- CT clamps enable dynamic load management, adapting charging to household consumption.
- Proper earthing ensures all fault currents are safely redirected, protecting users and property.
- Combined, these systems create a safe, efficient, and future-proof EV charging setup.
Permits & Compliance for Home EV Charger Installation
Installing a home EV charger is not just a matter of wiring a device to your fuse box. It involves adhering to legal, safety, and technical standards, obtaining any necessary permits, and ensuring long-term compliance with regulations. This ensures safety, avoids fines, and protects your property and insurance coverage.
Legal Requirements
Electricity Supply and Grid Operator Permissions
- In the Netherlands, the local grid operator (e.g., Liander, Stedin, Enexis) must be consulted if:
- You plan to install a high-power charger (typically >3.7 kW for single-phase or >11 kW for three-phase).
- Your existing electrical connection may need upgrading (e.g., main fuse increase or three-phase supply).
- The grid operator ensures that the local network can handle the additional load without risk of overloading transformers or cables.
- In some cases, a formal request or permit is required for:
- New three-phase connections
- Significant increases to single-phase supply
- Installation of a sub-panel or extension cabinet
Tip: Even if your charger is below 11 kW, check with your grid operator to avoid unexpected overloading issues.
Building Permits
- Most residential EV charger installations do not require a building permit if mounted on private property.
- A permit may be required if:
- The charger is mounted on an external wall of a listed or protected building
- The installation affects public spaces or shared infrastructure (e.g., apartment complexes)
- Always verify with your municipality (gemeente) for any local requirements.
Homeowner or VvE Approval
- If you live in a multi-unit building or community association, written approval may be required from:
- Homeowners’ association (VvE)
- Landlord or property management
- This ensures compliance with fire safety, structural integrity, and shared electrical capacity.
Standards & Compliance
Electrical Safety Standards
EV charger installation must comply with:
- NEN 1010: Dutch standard for low-voltage electrical installations
- IEC 60364: International low-voltage standard
- NEN-EN 61851: Standard for EV charging systems
- NEN-EN 62196: Standard for charging connectors (Type 2, CCS, etc.)
Why it matters: Adherence ensures:
- Safe operation under household loads
- Proper protection from electric shock, fire, and leakage currents
- Insurance coverage in case of electrical accidents
Equipment Certification
- Chargers and components should carry CE marking indicating compliance with EU safety directives.
- Ensure that RCDs, breakers, and cabling are certified for:
- AC/DC leakage detection
- Correct amperage ratings
- Fire-resistant and insulated materials
Inspection & Documentation
- After installation, it is recommended to obtain a certificate of compliance (keuringsrapport) from a licensed electrician.
- This document may be required for:
- Home insurance validation
- Future property sales
- Grid operator verification
Insurance Considerations
- Notify your home insurance provider about the EV charger installation.
- Proper compliance ensures liability coverage in case of electrical faults.
- Using licensed electricians and certified equipment is often a condition for coverage.
Practical Tips
- Always use a certified installer such as JML eplus who is familiar with NEN 1010 and IEC 60364 standards.
- Check with your grid operator before installing high-power chargers.
- Obtain written approval from VvE or landlord if needed.
- Request a certificate of compliance after installation.
- Keep all documentation and receipts for future inspections, insurance, or property sale.
Key Takeaways:
Permits and compliance are not just bureaucratic hurdles—they are essential for safety, reliability, and legal protection. Ensuring that your home EV charger installation adheres to regulations, standards, and insurance requirements avoids costly problems and ensures smooth operation for years to come.
Location & Practical Setup for Home EV Charger Installation
Choosing the right location and planning the practical setup of your EV charger is just as important as the electrical design. A well-thought-out setup ensures safe access, optimal charging performance, weather protection, and future-proofing.
Choosing the Charger Location
Proximity to Fuse Box
- Ideally, place the EV charger as close as possible to your main distribution board or sub-panel.
- Included 5 meters of cable includes going up and down walls or through walls from the fuse box.
- Why it matters:
- Reduces cable length, minimizing voltage drop and energy loss.
- Shorter cable runs reduce installation costs for wiring and conduits.
Tip: Use the cable sizing charts and consider future upgrades. Longer runs may require larger cable sizes to maintain efficiency.
5 meter length from fuse box (approx.)
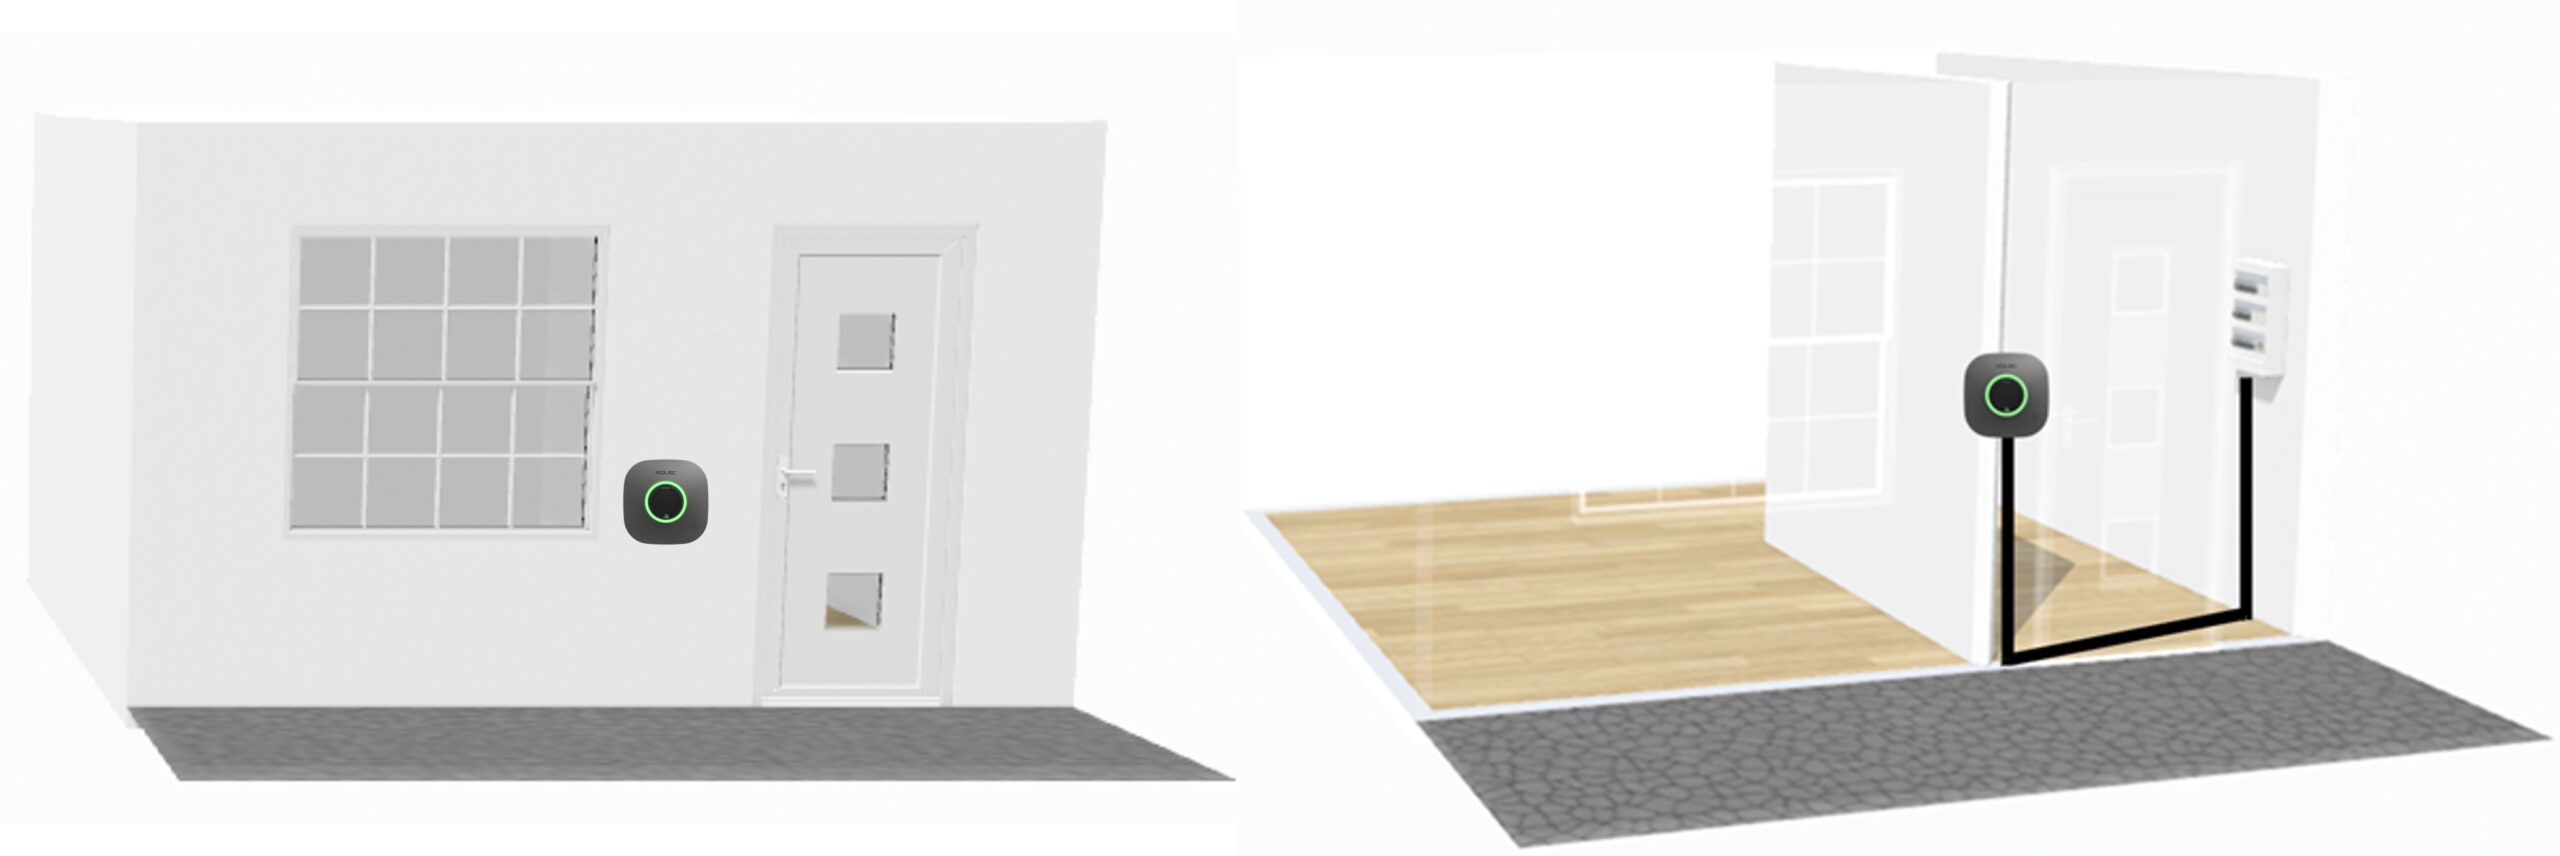
Parking Position
- Charger should be positioned where the car naturally parks for regular charging.
- Ensure easy access to the charging port without the need to stretch the cable excessively.
- For garages: consider wall-mounted or floor-standing chargers to optimize space and convenience.
- For driveways: ensure the charger is protected from vehicles, pedestrians, and obstacles.
Safety & Accessibility
- Height: Mount the charger at a convenient height for plugging/unplugging (usually 1.2–1.5 m from the ground).
- Clearance: Allow enough space around the charger for cable management, maintenance, and ventilation.
- Avoid hazards: Do not mount near water sources, combustible materials, or areas prone to flooding.
Weather Protection & Environmental Considerations
Outdoor Installations
- Chargers must be IP-rated for outdoor use (IP54 minimum; IP65 recommended for exposed areas).
- Protect against:
- Rain and snow
- Dust and debris
- UV exposure
- Consider a shelter or canopy if the charger is exposed to severe weather.
Temperature Considerations
- Extreme heat or cold can affect charger electronics.
- Ensure ventilation around the charger and avoid enclosed spaces that may overheat.
Cable Management
Cable Length
- Use a cable length that reaches the EV comfortably without tension or risk of damage.
- Typical lengths: 5–7 meters for single cars; longer may be needed for driveways or detached garages.
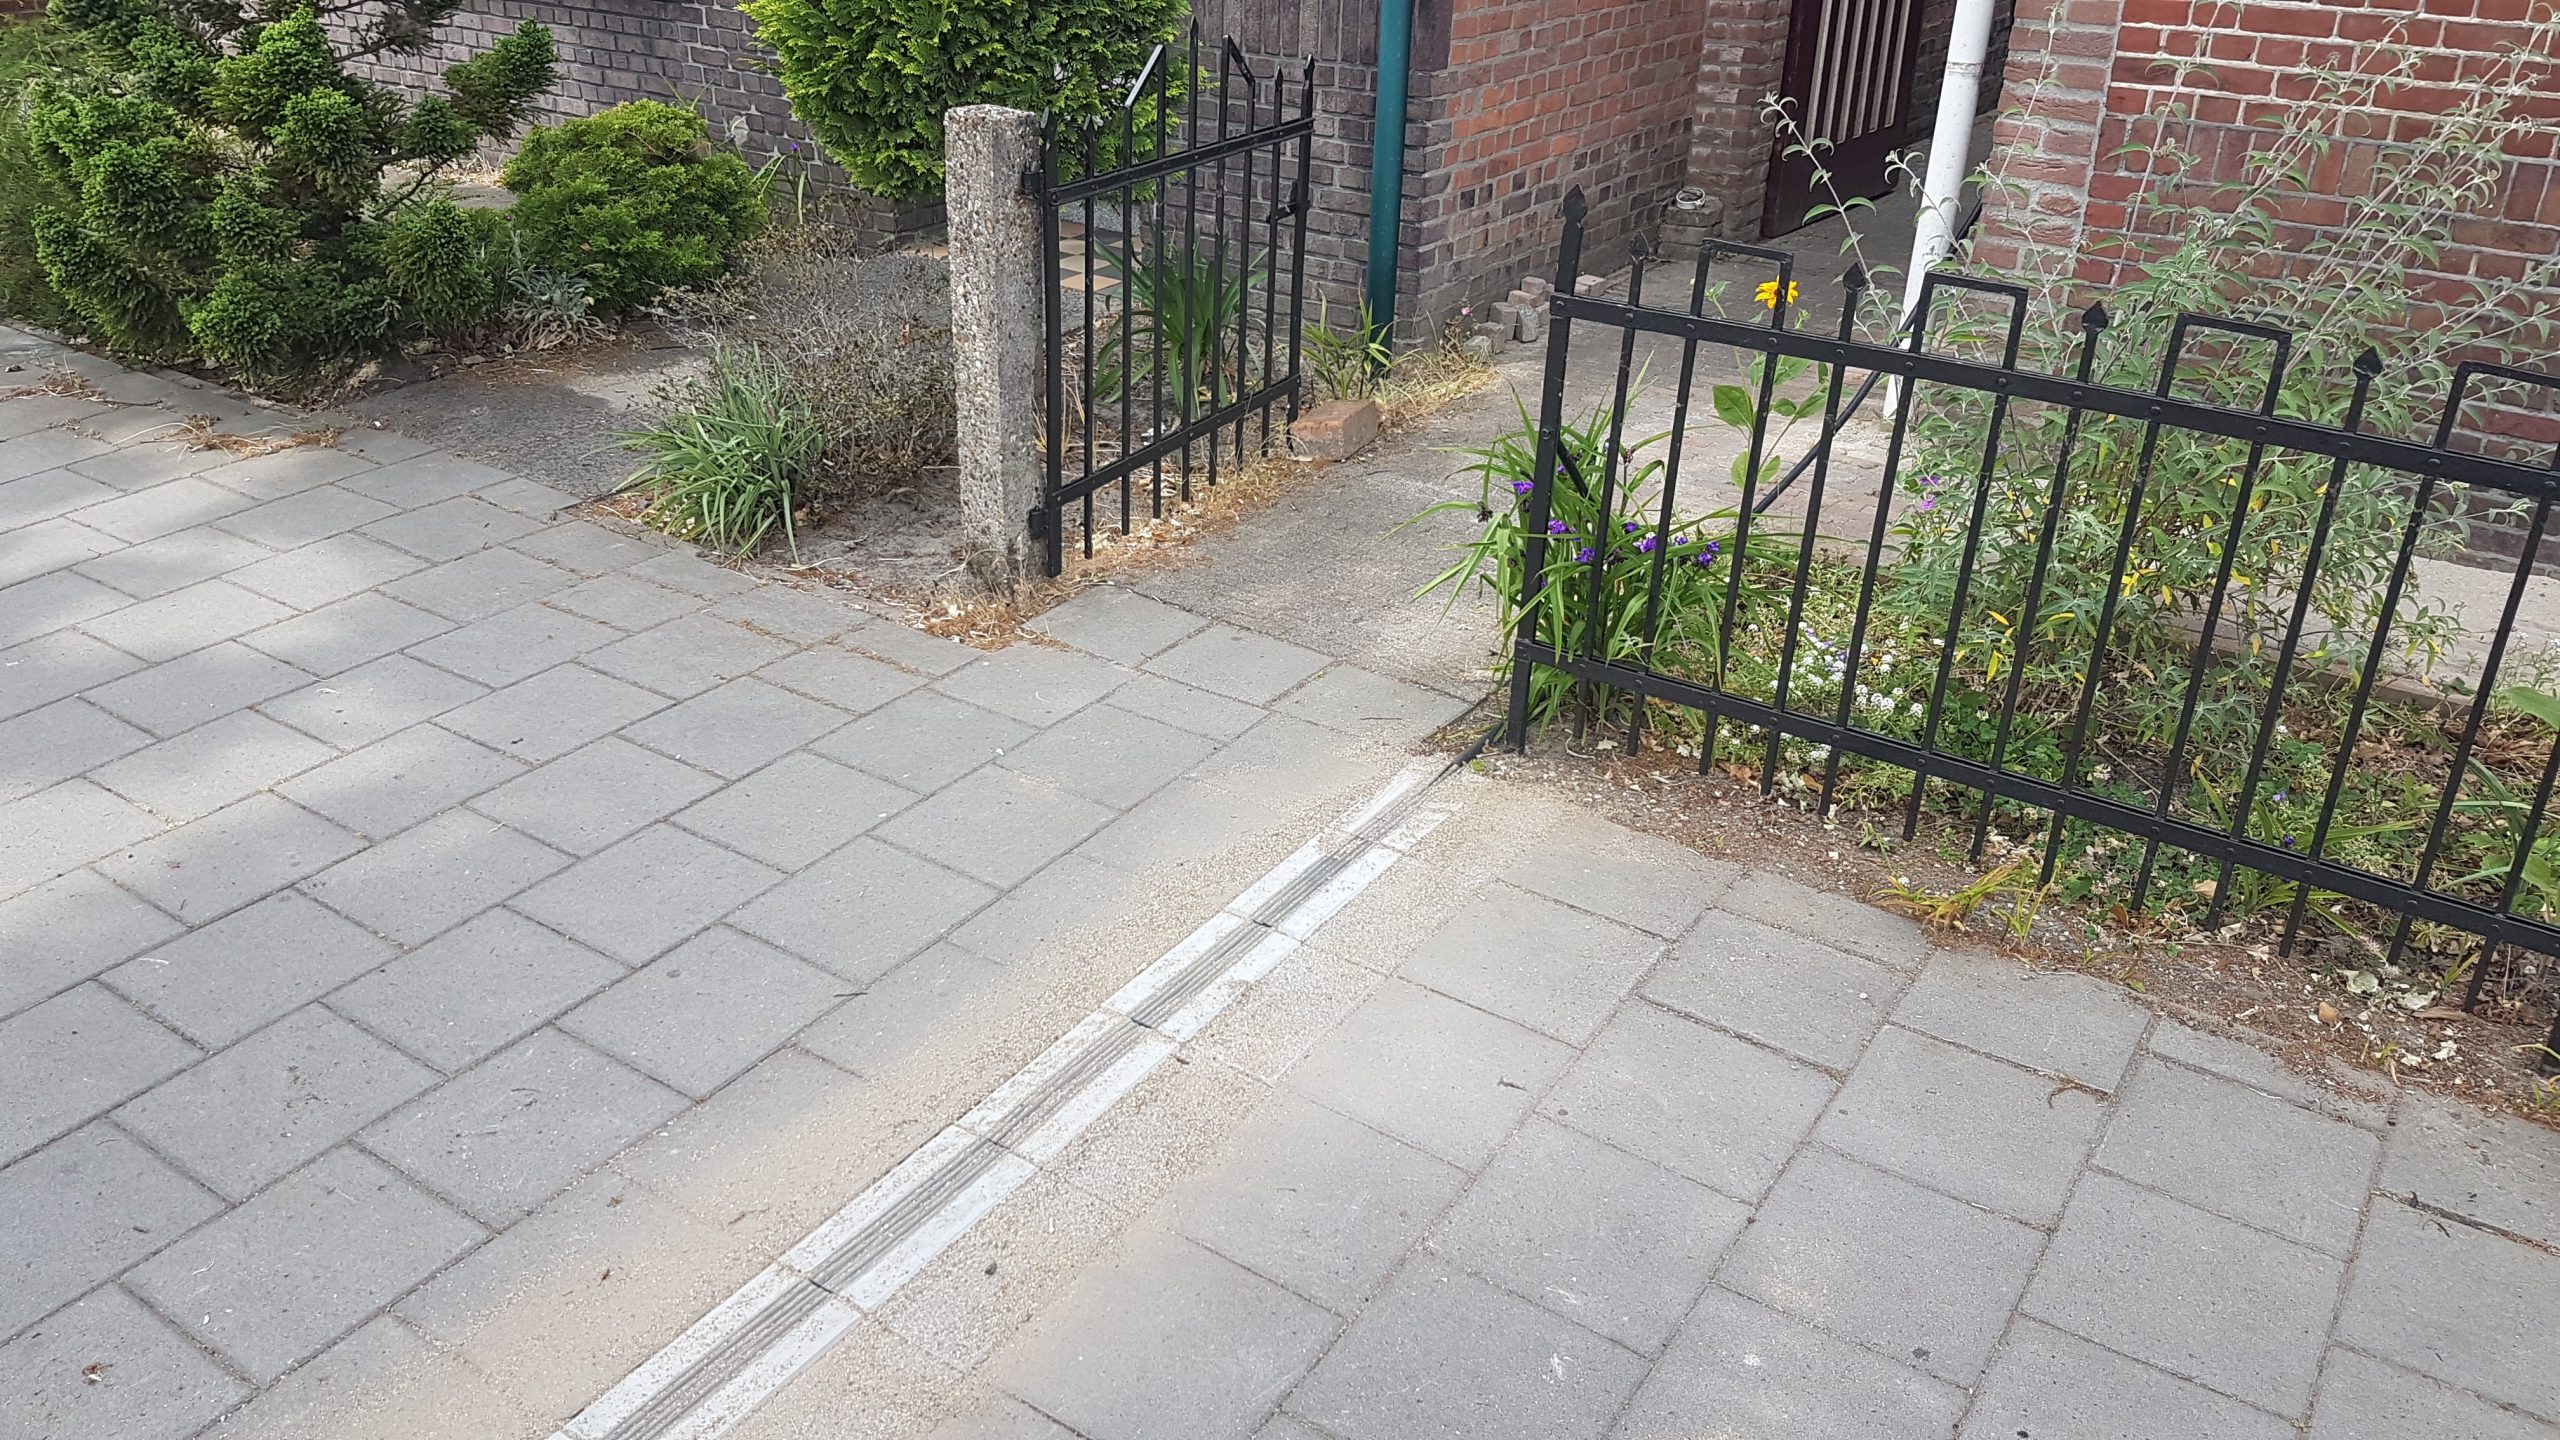
Cable Routing
- Avoid sharp bends, pinch points, and high-traffic areas.
- Use conduits or protective sleeves for cables running along walls, underground, or through exposed areas.
- Consider retractable cable reels or wall hooks for neat storage.
- Cannot be placed over the footpath so must be embedded or covered.
Future-Proofing
- Install a slightly longer cable or conduit than current needs, in case you switch EVs or need to relocate the charger.
- Leave space for additional circuits if you plan to add another EV or integrate solar/energy storage.
Charger Orientation & Mounting
- Wall-mounted chargers:
- Most common in garages and near walls.
- Secure mounting to ensure stability.
- Easy access for plugging/unplugging and maintenance.
- Freestanding chargers:
- Suitable for driveways or open parking areas.
- Require concrete or heavy-duty base for stability.
- Ensure cable outlet points are positioned to minimize stress on connectors.
Accessibility for Installation & Maintenance
- Allow electrician access to the charger for installation, RCD testing, and maintenance.
- Ensure space to replace the charger or components without major disruption.
- Avoid blocking doors, windows, or walkways.
Consider Shared or Multi-Unit Locations
- If installing in an apartment complex or shared driveway:
- Confirm permission from VvE or landlord.
- Ensure cable routing does not impede neighbors.
- Consider smart chargers with access control or RFID for multi-user setups.
Practical Tip Summary
- Place the charger close to the main distribution board.
- Ensure easy, safe access to the vehicle’s charging port.
- Protect the charger from weather, heat, cold, and physical damage.
- Plan cable routing, length, and storage to avoid tripping hazards or damage.
- Allow space for maintenance and future upgrades.
- In shared locations, ensure permissions and access controls are in place.
Key Takeaways
- A well-chosen location ensures efficiency, safety, and convenience.
- Proper mounting and cable management prevent wear and electrical hazards.
- Future-proofing the setup avoids costly relocation or upgrades.
- Accessibility and compliance with safety standards protect both users and property.
Cost Factors for Home EV Charger Installation
Installing a home EV charger involves more than just the purchase price of the charger. Several factors influence the total cost, from electrical requirements to labor, permits, and future-proofing considerations. Understanding these factors helps homeowners plan budgets and avoid surprises.
Charger Costs
- Standard AC Wallbox (3.7–7.4 kW, single-phase)
- Ideal for overnight home charging.
- Typical cost: €500–€1,000.
- High-Power AC Chargers (11–22 kW, three-phase)
- Charges faster; may require electrical upgrades.
- Typical cost: €1,000–€2,500.
- Smart Chargers
- Include load management, app integration, or RFID access.
- Typical cost: €700–€2,500 depending on brand and features.
Tip: Investing in a smart charger with dynamic load balancing can save costs on grid upgrades and prevent future limitations.
Electrical Installation Costs
Dedicated Circuit & Wiring
- Cost depends on:
- Distance from main fuse board to charger.
- Cable size and type (standard vs armored).
- Conduit installation if routing is external or underground.
- Typical cost: €300–€1,000 for a simple installation; longer distances or armored cabling may raise costs.
RCD / Breaker Upgrades
- Adding a dedicated RCD or Type B RCD: €150–€400.
- Upgrading breakers or adding a sub-panel: €200–€800.
Load Management & CT Clamps
- Optional but recommended for homes with high household load or multiple EVs.
- Dynamic load balancing systems (including CT clamps) cost €200–€600, excluding labor.
Earthing / Grounding
- Installing or upgrading grounding rods or bonding can add €100–€300.
- Critical for safety; cannot be skipped.
Electrical Supply Upgrades
Main Fuse Upgrade
- If the home’s existing fuse rating cannot support the EV charger:
- Single-phase upgrade (e.g., 25A → 35A): €250–€500.
- Three-phase upgrade (e.g., 3x25A → 3x35A): €500–€1,200.
- Requires approval from the grid operator.
New Three-Phase Connection
- If a three-phase supply does not exist but is needed for faster charging: €1,000–€2,500, depending on distance and grid connection complexity.
Labour Costs
- Certified electricians typically charge €50–€100 per hour in the Netherlands.
- Total labor depends on:
- Complexity of circuit installation
- Cable routing distance
- RCD, breaker, and grounding installation
- Permits and inspection requirements
Typical labor cost: €300–€800 for standard home installations.
Permits & Compliance Costs
- Grid operator approval: Usually free for small chargers, but higher loads may incur administrative fees.
- Municipal permits: Rare for private installations, but possible if the charger is mounted externally on listed buildings. Costs vary: €50–€200.
- Inspection / certificate of compliance: €100–€250.
Note: Obtaining proper certification protects against insurance issues in case of electrical faults.
Location & Practical Setup Factors Affecting Cost
- Distance to fuse box: Longer runs require more cabling, conduits, and labor.
- Charger mounting: Wall-mounted is typically cheaper; freestanding units require concrete bases (€100–€300).
- Weatherproofing: Outdoor chargers may need shelters or IP-rated enclosures, adding €50–€200.
- Cable management solutions: Retractable reels or additional protective conduits can add €50–€150.
Future-Proofing Costs
- Installing larger conduits or extra cabling for potential second EV or energy storage: €50–€200.
- Upgrading the electrical panel or RCD to accommodate higher power chargers: €200–€800.
Tip: Investing slightly more during initial installation can save thousands if you upgrade to faster chargers or add a second EV in the future.
Ongoing Costs
Electricity
- Home charging is cheaper than public fast charging.
- Electricity cost depends on:
- Time-of-use tariffs
- Battery size and charging frequency
Maintenance
- EV chargers require minimal maintenance, but periodic inspection of:
- RCDs and breakers
- Cable integrity
- Earthing connections
- Estimated annual maintenance: €50–€100.
Summary of Cost Ranges (Home Installation in the Netherlands)
Wide range reflects differences in charger type, distance, electrical upgrades, and future-proofing.
Key Takeaways
- Charger type and power heavily influence initial costs.
- Electrical upgrades (main fuse, three-phase supply, RCDs) can add significantly.
- Labor and cable routing are major cost contributors.
- Load management and future-proofing increase upfront cost but save money and improve safety in the long run.
- Budgeting for permits, inspection, and earthing ensures compliance and insurance coverage.